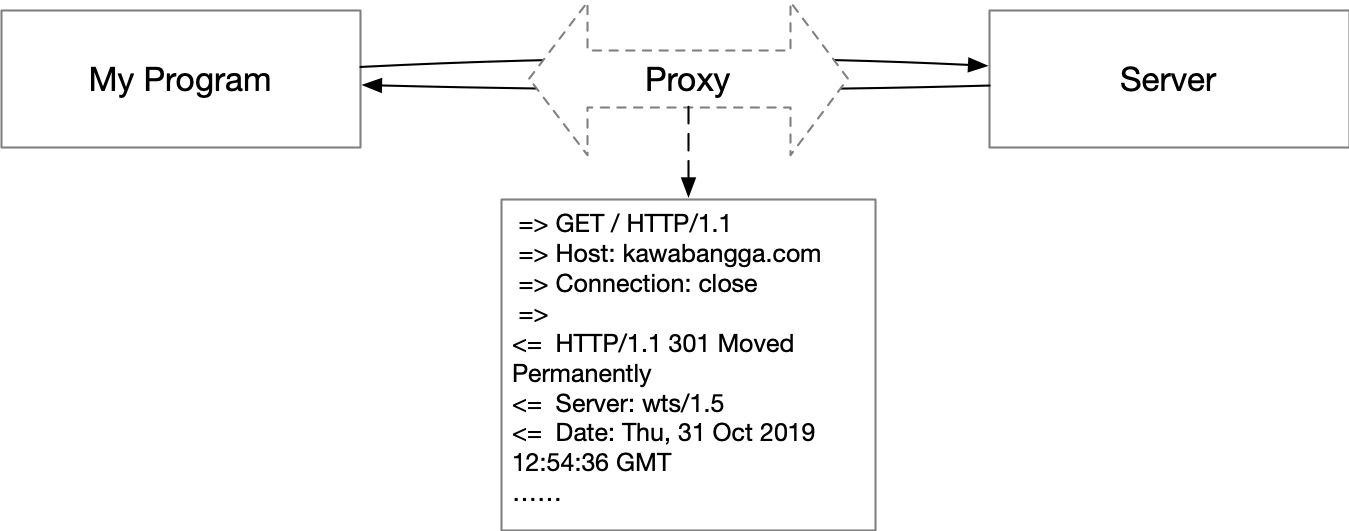
TL;DR 本文只用 Linux 自带的工具实现了一个可以将 TCP 流量打印出来的中间人代理程序(透明的)。脚本来源于这里。本文是对其工作原理的解释。
一般我们想知道一个 TCP 连接收发的内容时,会用 wireshark/tcpdump 这种工具,来把包抓下来分析查看。我开发 IRedis 的时候,就经常有这种需求,需要看看我的客户端对 server 到底发送了什么和接收了什么。用抓包工具不太方便,信息比较杂乱,操作也比较繁琐。在服务器上部署抓包工具的时候,还要给这些工具特殊权限。
其实这种需求可以不抓包的。因为 Redis 这种程序(RESP3协议)是基于 TCP 的,我们可以做一个代理,将发往 redis-server 的流量打印出来(输出到 stdout),然后再发给 redis-server。将 redis-server 的 Response 打印出来,再返回给客户端。相当于是一个中间人。
实现正向代理和反向代理都可以,反向代理不需要客户端支持,只是开一个端口,将所有发往这个端口的流量转发到 redis-server,所以我们这里用反向代理来实现。
在这篇文章中,我们只用 Linux 自带的工具,nc 来实现这个代理。还要用到 named pipe(因为 Linux 的 pipe 只支持单项传递,这里我们需要一个双向的代理),sed(用来对输出稍作格式化),trap (负责在退出的时候清理 named pipe)。
工作原理
我可以用一个最小化的版本解释这个中间人代理的工作原理,然后我们再来处理格式化输出。
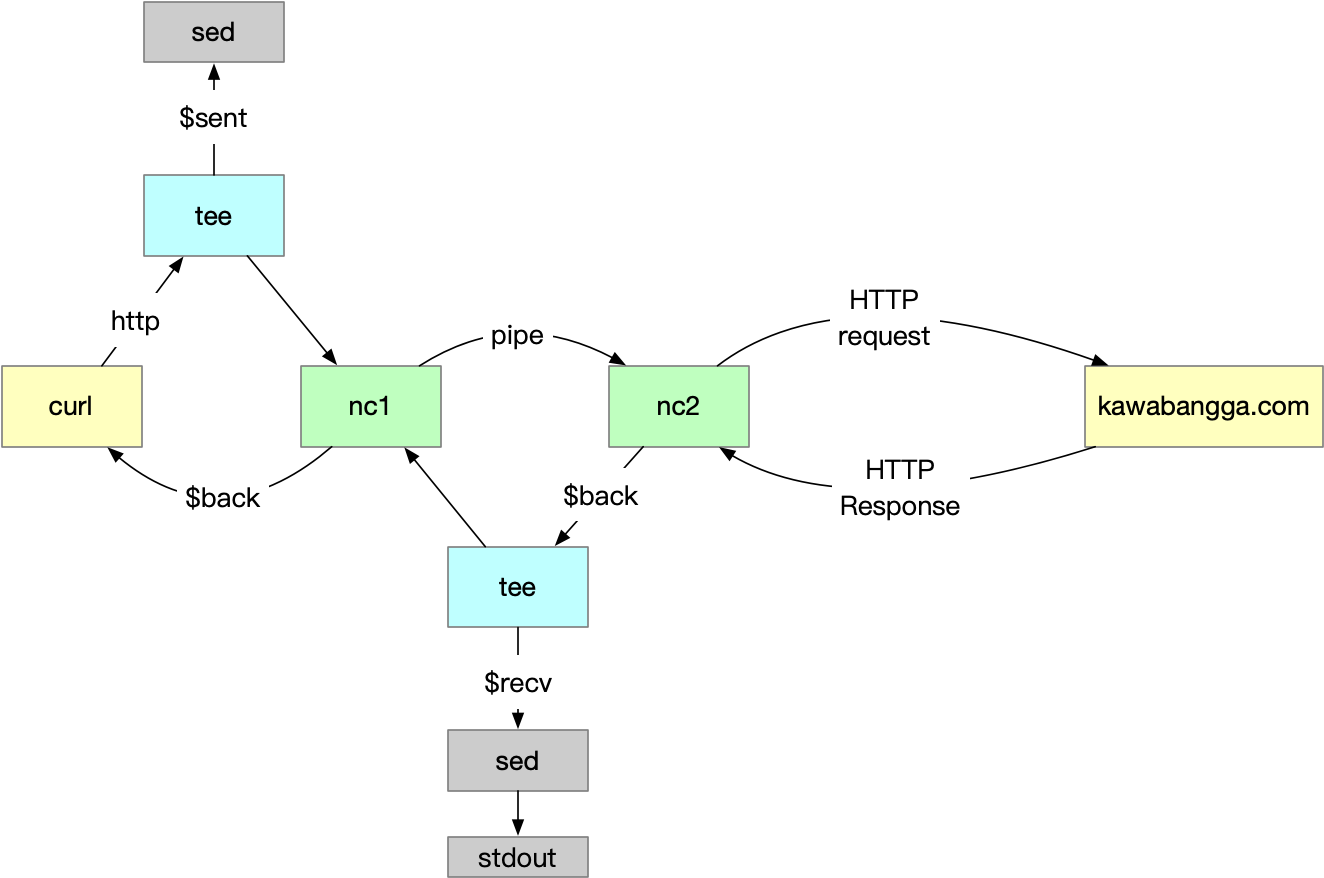
这个中间人代理只需要两个 nc ,一个负责接收客户端那边的输出,将这个输入传给另一个 nc;另一个 nc 接收前一个 nc 的输入,然后传给 Server(比如 redis-server)。Server 传回来的信息也一样,先进入后一个 nc (后面称呼它为 nc2 好了),然后传给前一个 nc (后面叫做 nc1)。在 nc1 -> nc2 和 nc2 -> nc1 的过程中,就可以把传递的东西给打印出来了。
我们先写一个简单的版本:
|
1 |
$ nc -l 8800 | nc kawabangga.com 80 |
这一行是监听 8800 端口,把收到的内容通过管道发给 nc2,然后 nc2 将内容发给 kawabangga.com 的 80 端口。其实就是一个 HTTP 代理啦。
用 curl 来试一下:
|
1 2 3 4 5 6 7 8 9 10 |
$ curl --proxy 127.0.0.1:8800 kawabangga.com -v * Trying 127.0.0.1:8800... * TCP_NODELAY set * Connected to 127.0.0.1 (127.0.0.1) port 8800 (#0) > GET http://kawabangga.com/ HTTP/1.1 > Host: kawabangga.com > User-Agent: curl/7.66.0 > Accept: */* > Proxy-Connection: Keep-Alive > |
注意这个 curl 是卡住了,并没有信息返回。
而两个 nc 那一行的输出是:
|
1 2 3 4 5 6 7 8 9 10 11 12 13 14 15 16 17 18 19 |
$ tmp nc -l 8800 | nc kawabangga.com 80 HTTP/1.1 301 Moved Permanently Server: wts/1.6.0 Date: Thu, 07 Nov 2019 12:09:52 GMT Content-Type: text/html; charset=iso-8859-1 Content-Length: 299 Connection: keep-alive Location: https://www.kawabangga.com/ X-Cache: from WTS <!DOCTYPE HTML PUBLIC "-//IETF//DTD HTML 2.0//EN"> <html><head> <title>301 Moved Permanently</title> </head><body> <h1>Moved Permanently</h1> <p>The document has moved <a href="https://www.kawabangga.com/">here</a>.</p> <hr> <address>Apache Server at kawabangga.com Port 80</address> </body></html> |
可以看到,第二个 nc 把服务器的返回直接输出到 stdout 了,而并没有返回给 curl。这样的代理是不合格的,因为我们不想夺走本该属于 curl 的 response。
一个优秀的代理应该完整的将服务器的回复还给客户端(curl),像下面这样。至于 stdout 的问题,我们先不管。
Linux 的 pipe 只支持从一边传给另一边,是单向的。那怎么做到后面的进程往前面的进程传呢?答案就是 namedpipe。Named pipe,嗯……顾名思义,就是有名字的管道。在本文中,理解成有了这个名字,我就可以控制重定向的方向,就好了。
我们用这一行,就完全可以实现图2那种传输。即 nc2 通过 named pipe 传给 nc1 ,nc 默认会将自己的 stdin 的内容传回给连接到 nc 的 TCP 另一头。
|
1 |
$ nc -l 8800 < fifo | nc kawabangga.com 80 > fifo |
用 curl 再来试一下:
|
1 2 3 4 5 6 7 8 9 10 11 12 13 14 15 16 17 18 19 20 21 22 23 24 25 26 27 28 29 30 |
curl --proxy 127.0.0.1:8800 kawabangga.com -v * Trying 127.0.0.1:8800... * TCP_NODELAY set * Connected to 127.0.0.1 (127.0.0.1) port 8800 (#0) > GET http://kawabangga.com/ HTTP/1.1 > Host: kawabangga.com > User-Agent: curl/7.66.0 > Accept: */* > Proxy-Connection: Keep-Alive > * Mark bundle as not supporting multiuse < HTTP/1.1 301 Moved Permanently < Server: wts/1.6.0 < Date: Thu, 07 Nov 2019 12:27:56 GMT < Content-Type: text/html; charset=iso-8859-1 < Content-Length: 299 < Connection: keep-alive < Location: https://www.kawabangga.com/ < X-Cache: from WTS < <!DOCTYPE HTML PUBLIC "-//IETF//DTD HTML 2.0//EN"> <html><head> <title>301 Moved Permanently</title> </head><body> <h1>Moved Permanently</h1> <p>The document has moved <a href="https://www.kawabangga.com/">here</a>.</p> <hr> <address>Apache Server at kawabangga.com Port 80</address> </body></html> * Connection #0 to host 127.0.0.1 left intact |
而 nc 那个命令行没有任何输出。
中间人打印TCP内容
OK,代理已经工作了,接下来要做的是将 TCP 内容打印出来。这里要做的是 nc 在将内容输出到 stdout (即管道)的同时,还要打印出来。
……当然是要用 tee 啦!
|
1 |
$ nc -l 8800 < fifo | tee in.txt | nc kawabangga.com 80 | tee out.txt > fifo |
这样可以用 tee 将 TCP 流量分别保存到 in.txt 和 out.txt 里面。可以用上面用过的 curl 测试一下。
因为 stdout 会被管道重定向,所以我们这里无法直接输出到屏幕了。那咋办呢?一不做二不休,再用 named pipe 将 tee 写入到 named pipe 中。
|
1 2 |
$ mkfifo logging $ nc -l 8800 < fifo | tee logging | nc kawabangga.com 80 | tee logging > fifo |
curl 之后,用 cat logging 就能看到 TCP 的内容啦。(这里如果不使用 cat 读出来 pipe 的内容,curl 会被 block 住)。
最终的脚本
最后,加点细节。写个脚本自动生成 named pipe,使用 trap 在退出的时候把创建的 named pipe 删掉。用 sed 格式化一下输出,分别加上 => 和 <= 。
代码如下(BSD 的 nc,适用于 OS X):
|
1 2 3 4 5 6 7 8 9 10 11 12 13 14 15 16 17 |
#!/bin/sh -e if [ $# != 3 ] then echo "usage: $0 <src-port> <dst-host> <dst-port>" exit 0 fi TMP=`mktemp -d` BACK=$TMP/pipe.back SENT=$TMP/pipe.sent RCVD=$TMP/pipe.rcvd trap 'rm -rf "$TMP"' EXIT mkfifo -m 0600 "$BACK" "$SENT" "$RCVD" sed 's/^/ => /' <"$SENT" & sed 's/^/<= /' <"$RCVD" & nc -l "$1" <"$BACK" | tee "$SENT" | nc "$2" "$3" | tee "$RCVD" >"$BACK" |
nc 的 BSD 版本和 GNU 版本不一样。如果你用的不是 Mac,要改下最后一行,加一个 -p. GNU 版本的代码如下:
|
1 2 3 4 5 6 7 8 9 10 11 12 13 14 15 16 17 |
#!/bin/sh -e if [ $# != 3 ] then echo "usage: $0 <src-port> <dst-host> <dst-port>" exit 0 fi TMP=`mktemp -d` BACK=$TMP/pipe.back SENT=$TMP/pipe.sent RCVD=$TMP/pipe.rcvd trap 'rm -rf "$TMP"' EXIT mkfifo -m 0600 "$BACK" "$SENT" "$RCVD" sed 's/^/ => /' <"$SENT" & sed 's/^/<= /' <"$RCVD" & nc -l -p "$1" <"$BACK" | tee "$SENT" | nc "$2" "$3" | tee "$RCVD" >"$BACK" |
使用效果如下(还是用 curl 测试):
|
1 2 3 4 5 6 7 8 9 10 11 12 13 14 15 16 17 18 19 20 21 22 23 24 25 |
➜ tmp ./tcp_proxy.sh 8800 kawabangga.com 80 => GET http://kawabangga.com/ HTTP/1.1 => Host: kawabangga.com => User-Agent: curl/7.66.0 => Accept: */* => Proxy-Connection: Keep-Alive => <= HTTP/1.1 301 Moved Permanently <= Server: wts/1.6.0 <= Date: Thu, 07 Nov 2019 12:50:38 GMT <= Content-Type: text/html; charset=iso-8859-1 <= Content-Length: 299 <= Connection: keep-alive <= Location: https://www.kawabangga.com/ <= X-Cache: from WTS <= <= <!DOCTYPE HTML PUBLIC "-//IETF//DTD HTML 2.0//EN"> <= <html><head> <= <title>301 Moved Permanently</title> <= </head><body> <= <h1>Moved Permanently</h1> <= <p>The document has moved <a href="https://www.kawabangga.com/">here</a>.</p> <= <hr> <= <address>Apache Server at kawabangga.com Port 80</address> <= </body></html> |
作为 redis-server 的代理效果:
|
1 2 3 4 5 6 7 8 9 10 11 12 13 14 |
➜ tmp ./tcp_proxy.sh 8800 127.0.0.1 6379 => *2 => $3 => get => $3 => foo <= $3 <= bar => *2 => $4 => llen => $7 => animals <= :0 |
Pretty cool uh? Now I am going to drink some tea!


可以用这个脚本实现redis 实例之间备份~
应该还是会有很多坑的,redis 的同步最好用官方的方案,全量同步,很简单的。